
Βήμα 1: Καρτέλα ”Επίπεδα”
Από το Company που έχεις δημιουργήσει μεταβαίνεις στο ”Σύστημα Πιστότητας” > ”Επίπεδα”.
Βήμα 2: Δημιουργία και Διαχείριση Επιπέδων
Πατώντας στο + μπορείς να προσθέσεις όσα επίπεδα θέλεις. Χρησιμοποιώντας τις μπάρες κύλισης (αριστερά – δεξιά), μπορείς να ορίσεις τους πόντους του κάθε επιπέδου. Μπορείς να προσθέσεις (+), να αφαιρέσεις (-) και να επεξεργαστείς όλα τα επίπεδα που έχεις δημιουργήσει οποιαδήποτε στιγμή. Επιπλέον, μπορείς οποιαδήποτε στιγμή να διαγράψεις όλα τα επίπεδα που έχεις δημιουργήσει επιλέγοντας Διαγραφή Όλων.
Αφού ολοκληρώσεις οποιαδήποτε επεξεργασία, κάνεις Αποθήκευση Αλλαγών.
Βήμα 1: Καρτέλα ”Κατάλογος”
Από το Company που έχεις δημιουργήσει μεταβαίνεις στο ”Σύστημα Πιστότητας” > ”Κατάλογος”.
Βήμα 2α: Προσθήκη δώρου (Δωροεπιταγή)
Επίλεξε Προσθήκη Δώρου. Στο αναδυόμενο συμπληρώνεις Όνομα και Περιγραφή δώρου, Κωδικό Καταλόγου και Κωδικό Δώρου.
Επιλέγεις τον Τύπο του Δώρου (Δωροεπιταγή), τη Δυνατότητα εξαργύρωσης σε όλα τα καταστήματα (εάν όχι, επιλέγεις συγκεκριμένα καταστήματα), την Κατηγορία Δώρου (βλ. Βήμα 5, εναλλακτικά επιλέγεις την προϋπάρχουσα κατηγορία ”Γενικά”), την Αξία Δώρου και τους Πόντους.
Υπάρχει η δυνατότητα να ορίσεις την διαθεσιμότητα του δώρου μόνο για τους πελάτες ενός συγκεκριμένου επιπέδου (ορίζεις το επίπεδο της επιλογής σου και προϋποθέτει να έχεις δημιουργήσει από πριν τα επίπεδα).
Επιλέγεις Προβολή δώρου στον κατάλογο, ώστε να είναι ορατό και προαιρετικά επισυνάπτεις Εικόνα Δώρου.
Μόλις ολοκληρώσεις την δημιουργία, κάνεις Αποθήκευση.
Βήμα 2β: Προσθήκη δώρου (Αγαθό)
Επίλεξε Προσθήκη Δώρου. Στο αναδυόμενο συμπληρώνεις Όνομα και Περιγραφή δώρου, Κωδικό Καταλόγου και Κωδικό Δώρου.
Επιλέγεις τον Τύπο του Δώρου (Αγαθό), τον Προμηθευτή (προϋποθέτει την εκ των προτέρων δημιουργία Προμηθευτών: Company > Οντότητες > Προμηθευτές), την Κατηγορία Δώρου (βλ. Βήμα 5, εναλλακτικά επιλέγεις την προϋπάρχουσα κατηγορία ”Γενικά”), την Αξία Δώρου και τους Πόντους.
Υπάρχει η δυνατότητα να ορίσεις την διαθεσιμότητα του δώρου μόνο για τους πελάτες ενός συγκεκριμένου επιπέδου (ορίζεις το επίπεδο της επιλογής σου και προϋποθέτει να έχεις δημιουργήσει από πριν τα επίπεδα).
Επιλέγεις Προβολή δώρου στον κατάλογο, ώστε να είναι ορατό και προαιρετικά επισυνάπτεις Εικόνα Δώρου.
Μόλις ολοκληρώσεις την δημιουργία, κάνεις Αποθήκευση.
Βήμα 3: Επεξεργασία υπάρχοντος δώρου
Για να επεξεργαστείς ένα ήδη δημιουργημένο δώρο, σέρνοντας την μπάρα κύλισης προς τα δεξιά, στη στήλη Ενέργειες πατάς στο μολυβάκι για επεξεργασία. Μετά την ολοκλήρωση των αλλαγών, κάνεις Αποθήκευση.
Βήμα 4: Διαγραφή υπάρχοντος δώρου
Για να διαγράψεις ένα δώρο, σέρνοντας την μπάρα κύλισης προς τα δεξιά, στη στήλη Ενέργειες πατάς στο σύμβολο Χ. Στο αναδυόμενο, επιλέγεις Διαγραφή.
Βήμα 5: Κατηγορίες Δώρων
Κατάλογος > Κατηγορίες > Προσθήκη κατηγορίας
Για τον διαχωρισμό των δώρων σε κατηγορίες, δημιούργησε τις κατηγορίες του καταλόγου σου και στη συνέχεια πρόσθεσε τα δώρα του καταλόγου σε κάθε κατηγορία από τον κατάλογο δώρων.
Βήμα 1: Καρτέλα ”Κάρτες Πιστότητας”
Από το Company που έχεις δημιουργήσει μεταβαίνεις στο ”Σύστημα Πιστότητας” > ”Κάρτες Πιστότητας”.
Βήμα 2: Νέα Παραγγελία
Επίλεξε Νέα Παραγγελία. Όρισε τον αριθμό των καρτών και τον τύπο (Barcode ή QR Code) και Αποθήκευση.
Βήμα 3: Αριθμοί καρτών
Κάνοντας ανανέωση στον browser, εμφανίζονται τα παρακάτω στοιχεία: Αριθμός Κάρτας, Κωδικός Πίσω όψης, Αριθμός Αναφοράς, Τύπος Κάρτας, Σε Χρήση και Ημερομηνία Ενεργοποίησης της κάθε κάρτας.
Βήμα 1: Καρτέλα ”Πολλαπλά Κουπόνια”
Από το Company που έχεις δημιουργήσει μεταβαίνεις στο ”Σύστημα Πιστότητας” > ”Πολλαπλά Κουπόνια”.
Βήμα 2: Δημιουργία Πολλαπλών Κουπονιών
Επιλέγεις ”Δημιουργία Πολλαπλού Κουπονιού”. Στο αναδυόμενο επιλέγεις την Κατηγορία Δώρου, ορίζεις το Όνομα και την Περιγραφή του κουπονιού, την Τιμή του, το Σύνολο των Κουπονιών που θες να δημιουργήσεις, την Ισχύ των Κουπονιών σε ημέρες και έναν Κωδικό Κύριου Κουπονιού.
Προαιρετικά, μπορείς να επιλέξεις την Αποστολή Αναφοράς τόσο για τα Εξαργυρωμένα Κουπόνια όσο και για την Κατάσταση των Πολλαπλών Κουπονιών. Στην πρώτη περίπτωση θα λαμβάνεις ενημερωτικό email για τα κουπόνια που έχουν εξαργυρωθεί και στην δεύτερη περίπτωση την συνολική κατάσταση όλων των κουπονιών που έχουν εκδοθεί για κάθε ενέργεια (ανεξάρτητα από το εάν έχουν εξαργυρωθεί ή όχι). Σε περίπτωση που επιλέξεις κάτι από τα δύο (ή και τα δύο), συμπληρώνεις μία έως τρεις διευθύνσεις email στις οποίες θέλεις να αποστέλλεται η αναφορά και ορίζεις την συχνότητα αποστολής της αναφοράς (επίλεξε μεταξύ των: ημερήσια, εβδομαδιαία ή μηνιαία αποστολή) και Αποθήκευση.
*Παρακάτω η μορφή των email για την κατάσταση των πολλαπλών κουπονιών:
Εξαργύρωση Δωροεπιταγής εντός Συναλλαγής
Βήμα 1: Καρτέλα “Νέα Συναλλαγή”
Από το Store που έχεις δημιουργήσει > Χρήση > Νέα Συναλλαγή.
Βήμα 2: Νέα συναλλαγή με επιλογή Εξαργύρωσης
Μόλις πληκτρολογήσεις στο κενό του Χρήστη τον Αριθμό Κινητού του πελάτη εμφανίζονται στο κάτω μέρος τα Διαθέσιμα Κουπόνια του πελάτη. Ορίζεις το ποσό της συναλλαγής και επιλέγεις το διαθέσιμο κουπόνι. Στο αναδυόμενο Απόκτηση Κουπονιού επιλέγεις ”Ναι” και εμφανίζεται πλαίσιο ώστε να συμπληρωθεί ο Κωδικός Επιβεβαίωσης που έχει σταλεί με SMS στον πελάτη. Ο κωδικός είναι ενεργός για 2 λεπτά και η πληκτρολόγησή του θα πρέπει να γίνει εντός χρονικού ορίου για την επιτυχή ολοκλήρωση της εξαργύρωσης.
*Η επιβεβαίωση γίνεται αυτόματα εντός δευτερολέπτων και δεν χρειάζεται να επιλέξεις επιβεβαίωση μετά την πληκτρολόγηση του 4ψήφιου κωδικού.
Εξαργύρωση δωροεπιταγής χωρίς προσθήκη ποσού
Η εξαργύρωση δωροεπιταγής μπορεί να πραγματοποιηθεί χωρίς να είναι υποχρεωτική η αγορά από τον πελάτη.
Μόλις πληκτρολογήσεις στο κενό του Χρήστη τον Αριθμό Κινητού του πελάτη εμφανίζονται στο κάτω μέρος τα Διαθέσιμα Κουπόνια του πελάτη και επιλέγεις κάποιο από αυτά. Στο αναδυόμενο Απόκτηση Κουπονιού επιλέγεις ”Ναι” και εμφανίζεται πλαίσιο ώστε να συμπληρωθεί ο Κωδικός Επιβεβαίωσης που έχει σταλεί με SMS στον πελάτη. Ο κωδικός είναι ενεργός για 2 λεπτά και η πληκτρολόγησή του θα πρέπει να γίνει εντός χρονικού ορίου για την επιτυχή ολοκλήρωση της εξαργύρωσης.
*Η επιβεβαίωση γίνεται αυτόματα εντός δευτερολέπτων και δεν χρειάζεται να επιλέξεις επιβεβαίωση μετά την πληκτρολόγηση του 4ψήφιου κωδικού.
Εξαργύρωση Δωροεπιταγής με κωδικο Κουπονιού ή Πολλαπλού Κουπονιού
Βήμα 1: Καρτέλα ”Εξαργύρωση”
Από το Store που έχεις δημιουργήσει > Χρήση > Εξαργύρωση.
Βήμα 2: Tab ”Εξαργύρωση Κωδικού Κουπονιού”
Στο πρώτο Tab ”Εξαργύρωση Κωδικού Κουπονιού” εισάγεις τον κωδικό που έχει ο πελάτης (είτε από απλό κουπόνι, είτε από πολλαπλό κουπόνι) και επιλέγεις Εξαργύρωση.
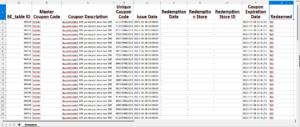
Tab Επισκόπηση κουπονιών:
Από το δεύτερο tab ”Επισκόπηση κουπονιών”, μπορείς να δεις συγκεντρωτικά όλα τα εξαργυρωμένα κουπόνια. Εάν έχεις δημιουργήσει πολλά κουπόνια, μπορείς να χρησιμοποιήσεις την αναζήτηση για πιο εύκολη πρόσβαση σε αυτά. Οι πληροφορίες που εμφανίζονται στις στήλες αφορούν την Εικόνα της δωροεπιταγής (εάν υπάρχει), τον Τύπο Κουπονιού, το Όνομα κουπονιού, τα Διαθέσιμα κουπόνια αυτού του είδους, οι Πόντοι που απαιτούνται για την απόκτησή του και τα Εξαργυρωμένα (μέχρι τώρα). Στην τελευταία στήλη Προβολή επιλέγοντας το σχετκό εικονίδιο (με το ματάκι) μπορείς να δεις αναλυτικά το Κινητό του Χρήστη που εξαργύρωσε, τον Κωδικό Κουπονιού ή Επιταγής και την Χρονοσφραγίδα (ημερομηνία και ώρα). Μπορείς να χρησιμοποιήσεις την Αναζήτηση, ώστε να έχεις ταχύτερη πρόσβαση στα δεδομένα που αναζητάς.
Tab ”Πολλαπλά Κουπόνια”:
Από το τρίτο tab ”Πολλαπλά Κουπόνια”, μπορείς να δεις συγκεντρωτικά όλα τα εξαργυρωμένα πολλαπλά κουπόνια. Οι πληροφορίες που εμφανίζονται σε στήλες αφορούν την Αξία των κουπονιών, την Χρονοσφραγίδα (ημερομηνία και ώρα εξαργύρωσης) και τον Κωδικό Κουπονιού. Μπορείς να χρησιμοποιήσεις την Αναζήτηση, ώστε να έχεις ταχύτερη πρόσβαση στα δεδομένα που αναζητάς.
Βήμα 1: Καρτέλα “Πελάτες”
Από το Company που έχεις δημιουργήσει μεταβαίνεις στο ”Οντότητες” > ”Πελάτες”.
Βήμα 2: Πληροφορίες Πελατών & Επεξεργασία (Tab ”Όλα”)
Στο tab ”Όλα” εμφανίζονται όλοι οι πελάτες και μπορείς να δεις όλες τις διαθέσιμες πληροφορίες που αφορούν τον εκάστοτε πελάτη. Οι διαθέσιμες πληροφορίες είναι οι εξής: ο Κωδικός Πελάτη, ο Αριθμός Κάρτας, το Κινητό, οι Συναλλαγές (αριθμητικά), οι Εξαργυρωμένοι Πόντοι, οι Διαθέσιμοι Πόντοι, η Συνολική Τιμή (αφορά το συνολικό τζίρο του κάθε πελάτη) και η επιλογή Ενέργειες.
Επιλέγοντας το μολυβάκι στις ”Ενέργειες” εμφανίζεται αναδυόμενο με Ενημέρωση Στοιχείων Πελάτη. Από εδώ μπορείς να επεξεργαστείς ή να προσθέσεις επιπλέον στοιχεία που αφορούν το Κατάστημα Αρχικής Εγγραφής, το Όνομα, το Επώνυμο, το Φύλο, τη Χώρα, το Κινητό και το Σταθερό τηλέφωνο του πελάτη. Επιπλέον, το email, την Ημερομηνία Γέννησης, τον Τ.Κ., την Διεύθυνση και το Νομό. Αλλαγές μπορούν να πραγματοποιηθούν και στα ενημερωτικά κανάλια μέσω των οποίων επιθυμεί να ενημερώνεται ο κάθε χρήστης. Μετά από κάθε τροποποιητική αλλαγή επιλέγεις Αποθήκευση.
Βήμα 3: ”Ορατές Στήλες”
Πατώντας στο “Ορατές Στήλες” μπορείς να ορίσεις ποια στοιχεία πελάτη θέλεις να είναι ορατά στην κεντρική σελίδα με τις πληροφορίες των πελατών σου. Αφαιρείς στήλες που δεν επιθυμεις να εμφανίζονται, αποεπιλέγοντάς τες και Κλείσιμο.
Βήμα 4: Πελάτες ανά κατάστημα (Tab ”Καταστήματα”)
Από το tab ”Καταστήματα” (εντός της καρτέλας “Πελάτες”) μπορείς να εμφανίσεις μόνο τους πελάτες συγκεκριμένου καταστήματος (σε περίπτωση που έχεις περισσότερα από ένα καταστήματα), κάνοντας κλικ στο tab ”Καταστήματα” ή πληκτρολογώντας το όνομα του καταστήματος.
Βήμα 5: CSV Πελατών
Μπορείς να εξάγεις τα στοιχεία των πελατών σου σε αρχεία csv, πατώντας στο σχετικό κουμπί (αριστερά από το κουμπί ”Προσθήκη Πελάτη”). Πατώντας πάνω του, επιλέγεις ”Λήψη Αρχείου CSV” και έπειτα ”Download XLS File”
Επισήμανση: Έτοιμη προς λήψη είναι πάντα η τελευταία έκδοση του αρχείου. Σε περίπτωση που θέλεις ανανεωμένη λίστα, διαγράφεις την τελευταία έκδοση κάνοντας κλικ στον κάδο και και επαναλαμβάνεις την προηγούμενη διαδικασία.
Βήμα 1: Καρτέλα “Νέα Συναλλαγή”
Από το Store που έχεις δημιουργήσει > Χρήση > Νέα Συναλλαγή.
Βήμα 2α: Συναλλαγή με αριθμό κινητού (με ποσό)
Σε περίπτωση που δεν έχεις ορίσει προϊόντα και κάνεις συναλλαγές με Συνολικό Ποσό, στο κενό του Χρήστη συμπληρώνεις τον Αριθμό Κινητού του πελάτη. Μόλις γίνει πράσινο, αριστερά εμφανίζονται οι Διαθέσιμοι Πόντοι του και ακριβώς από κάτω το Επίπεδο και οι Πόντοι για το επόμενο επίπεδο (σε περίπτωση που έχεις ήδη ορίσει Επίπεδα Χρηστών). Ορίζεις το Ποσό της Συναλλαγής και Προσθήκη, ώστε να αποδοθούν οι πόντοι.
Βήμα 2β: Συναλλαγή με αριθμό κινητού (με προϊόντα)
Σε περίπτωση που έχεις ορίσει προϊόντα, στο κενό του Χρήστη συμπληρώνεις τον Αριθμό Κινητού του πελάτη. Μόλις γίνει πράσινο, αριστερά εμφανίζονται οι Διαθέσιμοι Πόντοι του και ακριβώς από κάτω το Επίπεδο και οι Πόντοι για το επόμενο επίπεδο (σε περίπτωση που έχεις ήδη ορίσει Επίπεδα Χρηστών). Πατάς στο ”+Επίλεξε Προϊόντα” και ορίζεις τις ποσότητές τους. Αυτόματα (πάνω από τις ποσότητες των προϊόντων) θα εμφανιστούν το Σύνολο το προϊόντων και οι Κερδισμένοι Πόντοι (οι πόντοι που θα αποδοθούν μετά την ολοκλήρωση της συναλλαγής). Μόλις ολοκληρώσεις, πατάς Προσθήκη, ώστε να αποδοθούν οι πόντοι.
Βήμα 2γ: Συναλλαγή με αριθμό κάρτας
Σε περίπτωση που έχεις ορίσει προϊόντα, στο κενό του Χρήστη συμπληρώνεις τον Αριθμό Κάρτας του πελάτη. Μόλις γίνει πράσινο, αριστερά εμφανίζονται οι Διαθέσιμοι Πόντοι του και ακριβώς από κάτω το Επίπεδο και οι Πόντοι για το επόμενο επίπεδο (σε περίπτωση που έχεις ήδη ορίσει Επίπεδα Χρηστών). Πατάς στο ”+Επίλεξε Προϊόντα” και ορίζεις τις ποσότητές τους. Αυτόματα (πάνω από τις ποσότητες των προϊόντων) θα εμφανιστούν το Σύνολο το προϊόντων και οι Κερδισμένοι Πόντοι (οι πόντοι που θα αποδοθούν μετά την ολοκλήρωση της συναλλαγής). Μόλις ολοκληρώσεις, πατάς Προσθήκη, ώστε να αποδοθούν οι πόντοι.
*Επεξεργασία Στοιχείων Πελάτη κατά τη διάρκεια της Συναλλαγής
Στο κενό του Χρήστη συμπληρώνεις τον Αριθμό Κινητού του πελάτη. Ακριβώς στα δεξιά επιλέγεις το σχετικό εικονίδιο ”Προβολή/Επεξεργασία Στοιχείων”. Μετά από κάθε τροποποιητική αλλαγή Αποθήκευση.
Βήμα 1: Καρτέλα ” Στατιστικά”
Από το Company που έχεις δημιουργήσει μεταβαίνεις στο ”Διαχείριση” > ”Στατιστικά”.
Βήμα 2: Προβολή Στατιστικών Καταστημάτων & Εταιρείας
Ενεργοί Χρήστες (με συναλλαγές): Εμφανίζεται συνολικά ο αριθμός των Ενεργών Χρηστών από όλα τα επιμέρους καταστήματα – όπου ενεργός χρήστης νοείται χρήστης που έχει πραγματοποιήσει τουλάχιστον μία συναλλαγή κατά τους τελευταίους δύο μήνες.
Σύνολο Μοναδικών Χρηστών (τουλάχιστον μία συναλλαγή στο κατάστημα) : Εμφανίζεται συνολικά ο αριθμός των εγγεγραμμένων χρηστών από όλα τα επιμέρους καταστήματα.
- Μπάρα αναζήτησης ”Προβολή Συναλλαγών”: επιμερίζονται σε Συναλλαγές: 1. όλων των χρηστών, 2. offline χρηστών (πραγματοποιούν μόνο offline συναλλαγές), 3. online χρηστών (πραγματοποιούν μόνο online συναλλαγές), 4. online και offline χρηστών (πραγματοποιούν και online και offline συναλλαγές).
- Μπάρα αναζήτησης ”Ταξινόμηση κατά”: αφορά σε ταξινόμηση με βάση τον Κωδικό καταστήματος, Όνομα καταστήματος, Τελικό Ποσό (αφορά το συνολικό τζίρο), τις Συναλλαγές (αριθμητικό σύνολο), τους Πόντους (αριθμητικό σύνολο), τους Χρήστες (αριθμητικό σύνολο), τους Ενεργούς Χρήστες (τουλάχιστον μία συναλλαγή τους τελευταίους δύο μήνες σε αριθμητικό σύνολο), τις Κάρτες (σε περίπτωση που χρησιμοποιείς κάρτες πιστότητας) και την Περιφέρεια (σε περίπτωση που έχει δημιουργηθεί και δηλωθεί στην αρχική εγγραφή κάθε Store).
- Μπάρα αναζήτησης ”Προτεραιότητα Παραγγελίας”: προσανατολίζει την αναζήτηση με αύξουσα (ASC) ή φθίνουσα (DESC) ταξινόμηση.
- Γενική μπάρα αναζήτησης (με το μεγεθυντικό φακό): για ταχύτερη πρόσβαση στα δεδομένα που αναζητάς.
- Μπάρες αναζήτησης με βάση την Αρχική και την Τελευταία Ημερομηνία: για πιο συγκεκριμένη αναζήτηση με χρονική οριοθέτηση.
Βήμα 3: CSV Στατιστικών
Μπορείς να εξάγεις τα στοιχεία των στατιστικών σε αρχεία csv, πατώντας στο σχετικό κουμπί (αριστερά από τις μπάρες αναζήτησης). Πατώντας πάνω του, επιλέγεις ”Λήψη Αρχείου CSV” και έπειτα ”Download XLS File”
Επισήμανση: Έτοιμη προς λήψη είναι πάντα η τελευταία έκδοση του αρχείου. Σε περίπτωση που θέλεις ανανεωμένη λίστα, διαγράφεις την τελευταία έκδοση κάνοντας κλικ στον κάδο και και επαναλαμβάνεις την προηγούμενη διαδικασία.
1. Προσθήκη Πελάτη από Νέα Συναλλαγή
Βήμα 1: Καρτέλα “Νέα Συναλλαγή”
Από το Store που έχεις δημιουργήσει > Χρήση > Νέα Συναλλαγή.
Βήμα 2: Προσθήκη Πελάτη κατά την Συναλλαγή
Στο κενό του Χρήστη πληκτρολογείς τον Αριθμό Κινητού του πελάτη. Εμφανίζεται (ακριβώς δεξιά από το κινητό) το σχετικό εικονίδιο “Προβολή/Επεξεργασία Στοιχείων“. Στο αναδυόμενο “Στοιχεία Πελάτη” μπορείς να καταχωρήσεις όποια στοιχεία πελάτη θέλεις. Αφού ολοκληρώσεις την εγγραφή Αποθήκευση.
Αφού ορίσεις το ποσό της συναλλαγής και πατήσεις Προσθήκη, εμφανίζεται αυτόματα αναδυόμενο με Επαλήθευση κινητού τηλεφώνου. Συμπληρώνεις τον 4ψήφιο κωδικό που έχει αποσταλεί με SMS στο κινητό του πελάτη και Υποβολή.
2. Προσθήκη πελάτη από καρτέλα “Πελάτες”
Βήμα 1: Καρτέλα “Πελάτες”
Company > Οντότητες > Πελάτες.
Βήμα 2: Προσθήκη Νέου Πελάτη
Επιλέγεις “Προσθήκη Νέου Πελάτη” και συμπληρώνεις στα πεδία τα στοιχεία του πελάτη. Τα κατ’ ελάχιστον πεδία που απαιτούνται για την εγγραφή είναι η χώρα και ο αριθμός του κινητού του πελάτη. Αφού συμπληρώσεις τα δεδομένα > Αποθήκευση.
Βήμα 1: Καρτέλα “Συνεργάτες”
Από το Company που έχεις δημιουργήσει μεταβαίνεις στο ”Σύστημα Πιστότητας” > ”Συνεργάτες”.
Βήμα 2: Προσθήκη Συνεργάτη
Επιλέγεις ”Προσθήκη Συνεργάτη” και στο αναδυόμενο επιλέγεις από την αναζήτηση τον συνεργάτη που θέλεις και πατάς Προσθήκη Συνεργάτη.
Βήμα 3: Αποδοχή από Συνεργάτιδα Εταιρεία
Η εταιρεία που επέλεξες θα λάβει ένα email που θα ενημερώνεται για το αίτημά σου. (Sub: New Synergy Mail: New synergy has been created with you. Status currently is on pending. Login to roadcube.com to accept the synergy). Έπειτα θα πρέπει να εισέλθει στην πλατφόρμα της RoadCube και επιλέξει Ενεργοποίηση της συνεργασίας (Company > Συνεργασίες > Ενεργοποίηση).
Βήμα 4: Δημιουργία Δώρου για Εξαργύρωση στην Συνεργάτιδα Εταιρεία
Company > Κατάλογος > Προσθήκη Δώρου
Ακολουθείς την ίδια διαδικασία για Δημιουργία Δώρου και επιλεγεις ”Δυνατότητα Εξαργύρωσης Δώρου Σε Συνεργάτες”. Επιλέγεις την Εταιρεία που θέλεις να αναλάβει την εξαργύρωση του δώρου και εάν θέλεις να εξαργυρώνεται η δωροεπιταγή σε όλα τα καταστήματα της εκάστοτε εταιρείας ή μόνο σε επιλεγμένα και Αποθήκευση.
*Η συνέργεια ακυρώνεται και ενεργοποιείται εκ νέου οποιαδήποτε στιγμή, χρησιμοποιώντας τα σχετικά εικονίδια στις Ενέργειες: “Απενεργοποίηση” και ”Επαναποστολή“.
Βήμα 1: Καρτέλα “Ρυθμίσεις”
Από το Store > Ρυθμίσεις.
Βήμα 2: Tab ”Ανταμοιβή”
Στο δεύτερο tab ”Ανταμοιβή” > ”RoadCube POS” > Ενεργοποίηση > Αλλαγή Ρυθμίσεων.
Στο αναδυόμενο RoadCube POS εμφανίζονται 4 επιλογές:
Εμφάνιση ποσού σε POS: επιλέγοντάς το στις συναλλαγές θα πληκτρολογείς το ακριβές ποσό της κάθε συναλλαγής και ο πελάτης θα ανταμείβεται σύμφωνα με το πως έχεις ορίσει. Αν είναι αποεπιλεγμένο ο πελάτης θα επιβραβεύεται by default με 7 πόντους ανά συναλλαγή.
Σειριακές αγορές μέσω POS:
Android POS: Συναλλαγή με προϊόντα: επιλέγοντάς το θα εμφανίζονται κατά την διάρκεια της συναλλαγής τα προϊόντα και θα ορίζεις τις ποσότητές τους, ώστε να ανταμείβεις τον πελάτη. Εάν δεν θέλεις να εισάγεις προϊόντα το αποεπιλέγεις.
Αποδοχή όρων χρήσης & Πολιτικής απορρήτου με 4ψήφιο κωδικό pin: επιλέγοντάς το ο πελάτης κατά την πρώτη συναλλαγή που ισοδυναμεί με εγγραφή χρήστη θα λαμβάνει SMS με 4ψηφιο κωδικό.
Βήμα 3: Πόντοι Ανταμοιβής
Στο δεύτερο tab ”Ανταμοιβή” > ”Πληρωμές με Μετρητά – Offline Συναλλαγές” > Ενεργοποίηση > Αλλαγή Ρυθμίσεων.
Στο αναδυόμενο Ρυθμίσεις Offline Συναλλαγών:
Γενική απόδοση πόντων: Ορίζεις πόσοι πόντοι θα αποδίδονται ανά € και αν η στρογγυλοποίηση θα γίνεται προς τα πάνω ή κάτω.
Ενημέρωση χρήστη για ποντοδοσία: σε περίπτωση που θέλεις μετά από κάθε συναλλαγή να ενημερώνεται ο πελάτης για τους πόντους που κέρδισε επιλέγεις το κανάλι ειδοποίησης. Το μήνυμα που θα λαμβάνει έχει by default την ακόλουθη μορφή: ” Κερδίσατε Χ πόντους από την συναλλαγή που πραγματοποιήσατε”.
Μετά από κάθε τροποποιητική αλλαγή Αποθήκευση.
*Οι υπόλοιπες επιλογές αφορούν συναλλαγές μέσω της πλατφόρμας.
Άνοιγμα Εφαρμογής RoadCube > Ξεκίνα Τώρα > Εισαγωγή Προσωπικών Κωδικών Εισόδου > Σύνδεση
Ρυθμίσεις Συσκευής:
Εισαγωγή Λογότυπου: (προϋποθέτει να έχεις ήδη αποθηκευμένη την εικόνα του λογότυπού σου στο tablet). Πατάς ”Choose Image” > Επιλογή Φωτογραφίας > Edit > OK (πάνω δεξιά).
Ανώτερος αριθμός επιτρεπόμενων συναλλαγών ανά μέρα ανά χρήστη:
Επιλέγεις πόσες συναλλαγές μπορεί να κάνει ο χρήστης ανά ημέρα λειτουργίας. Εάν δεν θέλεις να υπάρχει κάποιος περιορισμός, το αφήνεις κενό. Εάν ο χρήστης ξεπεράσει τον αριθμό που έχεις ορίσει, θα εμφανιστεί σχετικό μήνυμα (βλ. παραπάνω στο video)
Ενεργοποίηση αναγνώρισης προσώπου: Το επιλέγεις αν θέλεις οι πελάτες μετά την πρώτη συναλλαγή τους που είναι και εγγραφή χρήστη να μην χρειάζεται να εισάγουν ξανά το κινητό τους, αλλά να γίνεται αυτόματα από την αναγνώριση προσώπου τους.
Animation έναρξης: επιλέγεις το χρώμα που θα εμφανίζεται στην έναρξη
Χρώμα κουμπιού έναρξης: επιλέγεις το χρώμα που θέλεις να έχει το κουμπί της έναρξης
Εγγραφή Χρήστη: Το επιλέγεις αν θέλεις οι πελάτες να συμπληρώνουν επιπλέον στοιχεία πέρα από τον αριθμό του κινητού τους. Επιπλέον στοιχεία που μπορούν να επιλεχθούν για εισαγωγή: Όνομα, Επώνυμο, Email, Ημερομηνία Γέννησης, Φύλο. Πόλη, ΤΚ. Διεύθυνση.
Εξαργύρωση κουπονιού: εμφανίζονται τρεις επιλογές εξαργύρωσης:
1. Άμεση εξαργύρωση: η εξαργύρωση των κουπονιών θα γίνεται την στιγμή της συναλλαγής και θα επιβεβαιώνονται μέσω 4ψήφιου κωδικού επαλήθευσης.
2. Εξαργύρωση σε επόμενη αγορά: η εξαργύρωση του κουπονιού θα γίνεται μέσω 12ψήφιου κωδικού ο οποίος θα αποστέλλεται στον πελάτη και θα μπορεί να τον χρησιμοποιήσει σε επόμενη αγορά του. Ο 12ψήφιος κωδικός εξαργύρωσης έχει ισχύ 25 ημέρες.
3. Όλες οι επιλογές εξαργύρωσης: ο πελάτης μπορεί να επιλέξει την στιγμή της εξαργύρωσης εάν θέλει να εξαργυρώσει άμεσα ή σε επόμενη αγορά μέσω 12ψήφιου κωδικού που θα λάβει σε SMS. Οι επιλογές εμφανίζονται στην οθόνη του tablet και ο πελάτης επιλέγει αυτήν που τον εξυπηρετεί.
Και στις τρεις περιπτώσεις είναι διαθέσιμο το κουμπί “ΠΑΡΑΒΛΕΨΗ“, σε περίπτωση που κάποιος πελάτης δεν επιθυμεί να εξαργυρώσει και θέλει να συνεχίσει να μαζεύει πόντους, πιθανόν για κάποιο κουπόνι μεγαλύτερης αξίας.
Σκανάρισμα καρτών: σε περίπτωση που χρησιμοποιείς κάρτες πιστότητας.
Αποδοχή όρων χωρίς SMS: με αυτή την επιλογή, μετά την εγγραφή κάθε χρήστη δεν θα στέλνεται SMS με τους όρους χρήσης και την πολιτική απορρήτου, αλλά θα εμφανίζονται στην οθόνη προς ανάγνωση και ο χρήστης θα τα αποδέχεται πατώντας “Αποδοχή“. Εναλλακτικά, εάν δεν το επιλέξεις, η αποδοχή των όρων θα γίνεται μέσω SMS με 4ψήφιο κωδικό.
Σκανάρισμα Απόδειξης (Ελληνικές ταμειακές): μπορείς να εισάγεις το ποσό της συναλλαγής μέσω σκαναρίσματος της απόδειξης.
Σκανάρισμα Απόδειξης μαζί με χειροκίνητη εισσαγωγή ποσού: σε περίπτωση που θέλεις να χρησιμοποιείς παράλληλα και τις δύο επιλογές.
Αφού ολοκληρώσεις τις επιλογές σου > Ενεργοποίηση Συσκευής.
Εγγραφή Χρήστη με Αποδοχή όρων με SMS
“Ξεκίνα να κερδίζεις” > Εισαγωγή Κινητού > ΟΚ.
Εάν έχεις επιλέξει την αναγνώριση προσώπου ο πελάτης μπορεί να επιλέξει αν θέλει η συσκευή να τον αναγνωρίζει με το αναγνωριστικό προσώπου τις επόμενες φορές.
Εισαγωγή 4ψήφιου κωδικού που έχεις αποσταλθεί με SMS στον πελάτη.
Εάν ο πελάτης δεν λάβει SMS, για οποιοδήποτε λόγο, μπορείς να επιλέξεις “Δεν έλαβα SMS” και οι όροι να εμφανιστούν στην οθόνη > Αποδοχή και συνέχεια στην συναλλαγή με εισαγωγή ποσού και επιβράβευση με πόντους οι οποίοι εμφανίζονται στην οθόνη.
Εγγραφή Χρήστη με Αποδοχή όρων χωρίς SMS
“Ξεκίνα να κερδίζεις” > Εισαγωγή Κινητού > ΟΚ.
Εάν έχεις επιλέξει την αναγνώριση προσώπου ο πελάτης μπορεί να επιλέξει αν θέλει η συσκευή να τον αναγνωρίζει με το αναγνωριστικό προσώπου τις επόμενες φορές.
Αποδοχή όρων στην οθόνη του tablet και συνέχεια στην συναλλαγή με εισαγωγή ποσού και επιβράβευση με πόντους οι οποίοι εμφανίζονται στην οθόνη.
Εγγραφή πελάτη με στοιχεία:
Σε περίπτωση που στις αρχικές ρυθμίσεις έχεις επιλέξει: Έγγραφή Χρήστη (ορισμός επιπλέον στοιχείων πελάτη πέραν του αριθμού κινητού) η εγγραφή του πελάτη θα γίνεται ως εξής:
“Ξεκίνα να κερδίζεις” > Εισαγωγή Κινητού > ΟΚ.
Εάν έχεις επιλέξει την αναγνώριση προσώπου ο πελάτης μπορεί να επιλέξει αν θέλει η συσκευή να τον αναγνωρίζει με το αναγνωριστικό προσώπου τις επόμενες φορές.
Εισαγωγή 4ψήφιου κωδικού που έχεις αποσταλθεί με SMS στον πελάτη ή εναλλακτικά αποδοχή όρων την οθόνη.
Εισαγωγή στοιχείων πελάτη που έχεις επιλέξει στις αρχικές ρυθμίσεις > Εγγραφή > συνέχεια στη συναλλαγή με εισαγωγή ποσού ή προϊόντων και επιβράβευση συναλλαγής με πόντους.
Εξαργύρωση κουπονιού:
“Ξεκίνα να κερδίζεις” > Εισαγωγή Κινητού > ΟΚ.
Εάν έχεις επιλέξει την αναγνώριση προσώπου ο πελάτης μπορεί να επιλέξει αν θέλει η συσκευή να τον αναγνωρίζει με το αναγνωριστικό προσώπου τις επόμενες φορές.
Εμφανίζονται στην οθόνη του tablet “ΤΑ ΔΩΡΑ ΣΟΥ“. Επιλέγεις το δώρο και στο επόμενο βήμα εισάγεις τον 4ψήφιο κωδικό που θα αποσταλεί με SMS στο κινητό του πελάτη. Ο κωδικός είναι ενεργός και πρέπει να πληκτρολογηθεί εντός 2 λεπτών > ΟΚ > εμφάνιση μηνύματος “Συγχαρητήρια” για την επιβεβαίωση της εξαργύρωσης και συνέχεια στην συναλλαγή με εισαγωγή ποσού και επιβράβευση με πόντους οι οποίοι εμφανίζονται στην οθόνη.
Κωδικός εξαργύρωσης – “Έχω ένα κουπόνι”:
“Ξεκίνα να κερδίζεις” > “Έχω ένα κουπόνι” > εισαγωγή 12ψήφιου κωδικού > ΟΚ > επιβεβαιωτικό μήνυμα ”Συγχαρητήρια έχετε εξαργυρώσει το δώρο “…” επιτυχώς”.
Παράβλεψη εξαργύρωσης:
“Ξεκίνα να κερδίζεις” > Εισαγωγή Κινητού > ΟΚ.
Εάν έχεις επιλέξει την αναγνώριση προσώπου ο πελάτης μπορεί να επιλέξει αν θέλει η συσκευή να τον αναγνωρίζει με το αναγνωριστικό προσώπου τις επόμενες φορές.
Εμφανίζονται στην οθόνη του tablet “ΤΑ ΔΩΡΑ ΣΟΥ” > ΠΑΡΑΒΛΕΨΗ > και συνέχεια στην συναλλαγή με εισαγωγή ποσού και επιβράβευση με πόντους οι οποίοι εμφανίζονται στην οθόνη.
Συναλλαγή με ποσό (νέος πελάτης):
“Ξεκίνα να κερδίζεις” > Εισαγωγή Κινητού > ΟΚ.
Εάν έχεις επιλέξει την αναγνώριση προσώπου ο πελάτης μπορεί να επιλέξει αν θέλει η συσκευή να τον αναγνωρίζει με το αναγνωριστικό προσώπου τις επόμενες φορές.
Αποδοχή όρων στην οθόνη του tablet και συνέχεια στην συναλλαγή με εισαγωγή ποσού και επιβράβευση με πόντους οι οποίοι εμφανίζονται στην οθόνη.
Συναλλαγή με ποσό (εγγεγραμμένος πελάτης με αναγνώριση προσώπου):
“Ξεκίνα να κερδίζεις” > αναγνώριση προσώπου ήδη εγγεγραμμένου πελάτη (εμφάνιση κινητού στην οθόνη του tablet) > εισαγωγή ποσού > ΟΚ > εμφάνιση πόντων επιβράβευσης της συναλλαγής.
Εάν έχεις επιλέξει την αναγνώριση προσώπου ο πελάτης μπορεί να επιλέξει αν θέλει η συσκευή να τον αναγνωρίζει με το αναγνωριστικό προσώπου τις επόμενες φορές.
Συναλλαγή με προϊόντα:
“Ξεκίνα να κερδίζεις” > Εισαγωγή Κινητού > ΟΚ.
Εάν έχεις επιλέξει την αναγνώριση προσώπου ο πελάτης μπορεί να επιλέξει αν θέλει η συσκευή να τον αναγνωρίζει με το αναγνωριστικό προσώπου τις επόμενες φορές.
Στην οθόνη του tablet εμφανίζονται “ΤΑ ΔΩΡΑ ΣΟΥ“. Εάν κάνεις την εξαργύρωση, ακολουθείς την διαδικασία με τον 4ψήφιο κωδικό, εναλλακτικά επιλέγεις “Παράβλεψη”.
Στο επόμενο βήμα “Επίλεξε Προϊόντα“, επιλέγεις τα προϊόντα και ορίζεις τις ποσότητες αυτών > Υποβολή (κάτω από την “Υποβολή” εμφανίζεται το συνολικό ποσό της συναλλαγής) > εμφάνιση πόντων επιβράβευσης της συναλλαγής.